'MSDN'에 해당되는 글 15건
- 2008.01.25 제어판에 네트웍 설정 추가하기
- 2007.12.10 Windows CE Screen Rotation
- 2007.11.16 Microsoft MSDN POPCON 개발자 사이트
- 2007.11.14 Windows Embedded CE 6.0 Catalog Items
- 2007.10.17 Windows Embedded CE 6.0 platform builder 설치 순서.
현재 ThinClient를 위한 Windows Embedded CE 6.0 이미지를 제작하고 있다.
디폴트로 이미지를 생성하니.. 아이피를 변경할 수 있는 부분이 없어서.. 한참을 고민했다... -_-
이미지를 생성할 때 이놈의 아이피를 .reg에 넣는 수밖에 없는가... ㅡㅡ; 라고..
이리 저리 ThinClient의 기능을 만지작 거리다 보니 제어판으로 들어갈 수 있는 부분(초기화면에서 F2키를 누름)이 있더군..
근데.. IP를 세팅할 수 있는 부분이 여기도 없다..
그래서 결론은 "이 제어판에 아이피 세팅하는 부분을 추가하자!" 이다.
아래 그림과 같이 OS Design을 할 때 Catalog Items View에서 "Network User Interface"라는 녀석을 추가해 주면 된다.
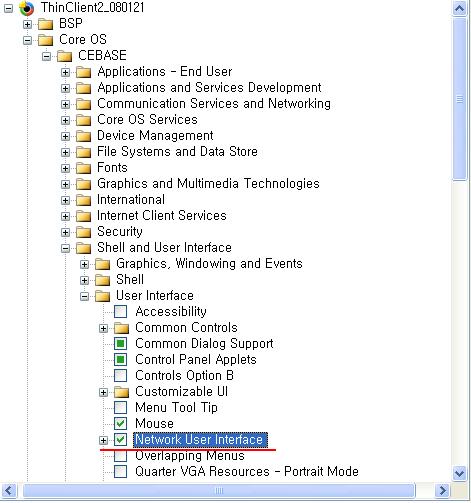
관련된 정보는 MSDN에서 찾아 확인 할 수 있다.
Windows Embedded CE provides the Network User Interface (NetUI) that defines configuration settings for the Network and Dial-up Connections icon in Control Panel.
 In This Section
- Network User Interface OS Design Development
Presents Network User Interface information that is helpful for designing and developing a Windows
Embedded CE OS. This includes dependency information, the modules and components that
implement Network User Interface, and implementation considerations.
- Network User Interface Migration
Presents information that is important to know if you are migrating from one version of Windows
Embedded CE to another.
- Network User Interface Samples
Describes sample code that is available in the %_WINCEROOT%\Public\Common\Oak\Drivers
\netui directory.
- Network User Interface Reference
Provides language reference information for the Network User Interface functions and structures.
Network User Interface Reference
Provides language reference information for the Network User Interface functions and structures. - Network User Interface Migration
Related Sections - Networking - Core
Provides conceptual and reference information about general networking technologies.
원인을 잘 모르겠고.. 사실 안될 구석이 없었기에..
결국 'Build -> Clean Solution'을 해주고나서 'Build -> Build Solution'을 해주니 정상적으로 빌드가 되는 것이다.
뭐 이런게 다있지?? 라는 생각도 있지만, 하나의 경험으로 생각하고 넘어감!! 나중에 이런 경우가 발생한다면 Clean Solution을 하고 다시 Build Solution을 해주면 정상적으로 빌드가 될 수도 있다는 '노하우'를 얻었으니..
'Windows Embedded > Windows Embedded CE 6.0' 카테고리의 다른 글
| CEPC 해상도 조절 (0) | 2008.01.30 |
|---|---|
| 펜티엄 3 기계에 Windows Embedded CE 6.0 설치 (0) | 2008.01.29 |
| RDP를 이용한 Seamless환경.. (0) | 2007.12.24 |
| Windows CE해상도 수정.. (0) | 2007.12.24 |
| Windows CE BiosLoader에서 로고 바꾸기! (0) | 2007.12.17 |
Windows CE Screen Rotation
Windows CE에서 화면을 회전(Screen Rotation)하는 방법에 대한 문서이다.
갑자기 해야할 일이 생겨서 여기 저기 문서를 뒤지다가.. MSDN에 있는 문서를 참고해서 대충 돌아가는 것만 확인했다.
하나의 응용프로그램을 만들어 실행(더블클릭) 시 90도씩 시계 반대방향으로 화면이 회전하는 것이다. 일반적으로 PDA같은 곳에 있는 기능이라고 하여 시도를 해본 것이다.
참고로 현재는 멀티 스크린은 적용되지 않고, 또 screen rotation 프로그램을 실행시키게 되면 커서나 마우스의 동작이 자동으로 바뀐 스크린에 맞게 동작을 하게 된다.
그리고, screen rotation은 display driver가 screen rotation을 지원할 경우에만 가능하다. 더 자세한 사항은 'Screen Rotation'를 참조하면 될 듯 하다.
참고한 'MSDN( How to Implement Screen Rotation)' 링크이다.
다음은 Screen Rotation APP를 만드는 절차이다.
| Step | Topic |
|---|---|
| 1. Create an OS design. Make the following choices in the Windows Embedded CE 6.0 OS Design Wizard:
| |
| 2. Make the registry changes. | |
| 3. Create a project for the screen rotation application. | |
| 4. Specify whether you are building a release or debug configuration of the OS design. Choose the release build. | |
| 5. Build the run-time image. The following list shows the choices to make:
| |
| 6. Download the run-time image. | |
| 7. Run the application and verify the screen rotation. To execute the sample application on the CEPC, right-click the Start button and choose Run. Type ScreenRotationProj and choose OK. Verify that the screen has rotated by 90 degrees. Each time you run the ScreenRotationProj program, the screen will rotate by 90 degrees. | Not applicable. |
'Windows Embedded > Windows Embedded CE 6.0' 카테고리의 다른 글
| Windows CE해상도 수정.. (0) | 2007.12.24 |
|---|---|
| Windows CE BiosLoader에서 로고 바꾸기! (0) | 2007.12.17 |
| Debug port, UART, Serial, COM에 대한 간단한 정리.. (0) | 2007.12.06 |
| Windows CE에서 Debug Port 설정 (0) | 2007.12.06 |
| Windows CE Boot Loader의 흐름 (0) | 2007.12.05 |
국외의 개발자 사이트를 보게 되면 'Channel9'과 같이 개발자 포럼 및 동영상으로 강좌(?) 비슷한 것들을 하는 것이 꽤 있다.

흠.. 보고 싶어도.. 알고 싶어도.. 언어의 압박은 어쩔 수 없다...
국내에도 비슷한 서비스가 있어 간단히 소개를 한다.
'MSDN POPCON'이라는 것인데..

국내 개발자를 위해 MS Korea에서 만든 듯 하다. 나름 흥미있는 볼거리가 있는 것 같다.
아직 서비스를 한지 얼마 되지는 않아 자료는 많지 않지만.. 앞으로 기대가 되는 서비스이다.
Windows Embedded CE 6.0 Catalog Items
Platform Builder에서 좌측의 카탈로그 아이템 뷰(Catalog Items View)를 보면 수많은 카탈로그 아이템들이 있는 것을 볼 수 있다. 솔직히 너무 많이 뭐가 뭔지 잘 모르고 사용하고 있다.
대충 보고 이거다 싶으면 추가시키는 형식이다... ㅡㅡㅋ

이제는 이녀석들이 어떤 녀석들인지 조금이라도 알고 사용하고자 한다. 아는게 힘이니깐... ㅋ
것보다 사용하지도 않는 것들을 추가시켜 용량을 이미지의 용량을 늘리는 쓸데없는 짓을 방지하기 위한 차원이랄까?? 뭐 대충 그런거다.
MSDN을 보면 Catalog Items에 대한 간략한 설명이 있는 곳이 있어 링크한다.
위의 링크를 클릭하면 아래와 같은 페이지를 볼 수 있으며, Catalog Items에 대한 정보를 얻을 수가 있다.

이 웹페이지를 참고해서 필요한 녀석들을 추가하도록 하자!!
'Windows Embedded > Windows Embedded CE 6.0' 카테고리의 다른 글
| Windows Embedded CE 6.0에서 한글 폰트 설정 (2) | 2007.11.22 |
|---|---|
| Windows Embedded CE 6.0 R2 릴리즈 & 설치 (0) | 2007.11.16 |
| WinCE 6.0의 Network Projector (0) | 2007.11.08 |
| Windows Embedded CE update (0) | 2007.11.06 |
| Windows Embedded CE 6.0의 OSDesign에서 Platform manager를 추가하지 말라! (0) | 2007.11.05 |
Windows Embedded CE 6.0 platform builder 설치 순서.
기존의 CE5.0과는 달리 6.0의 플랫폼 빌더는 Microsoft visual studio 2005에 embedded된 형태로 사용하게 된다. 그래서 가장 먼저 할 일은 visual studio 2005를 설치해야 한다.
1. Visual Studio 2005 Professional Edition 을 설치한다.
(Express 버전 또는 Standard 버전은 동작하지 않으므로 설치하시면 안된다.)
2. Visual Studio 2005 SP1을 설치한다.
만일 가지고 있지 않다면 여기서 다운로드 받도록 한다.
3. CE 6.0 Platform Builder 설치한다.
설치 시 Custom Setup 에서 Shared-Source for Windows CE License 설치한다. 그래야 소스코드가 보인다고 한다.
대충 이렇게 하면 Windows Embedded CE 6.0의 설치가 끝나게 된다.
그밖의 궁금한 점등은 msdn이나 웹 캐스트를 참조하면 될 듯하다.
'Windows Embedded > Windows Embedded CE 6.0' 카테고리의 다른 글
| [WindowsCE 6.0 특집 ②] 윈도우 임베디드 CE 6.0의 Cellcore 및 RIL 기능 (0) | 2007.10.18 |
|---|---|
| [WindowsCE 6.0 특집 ①] 연결된 장치 개발을 위한 윈도우 임베디드 CE 6 플랫폼 (0) | 2007.10.18 |
| Windows CE 개발자를 위한 커뮤니티들.. (0) | 2007.10.17 |
| Windows Embedded CE 6.0 관련 웹 캐스트 (0) | 2007.10.17 |
| Platform Builder 6.0의 Catalog Items View... (0) | 2007.10.17 |
 Prev
Prev

 Rss Feed